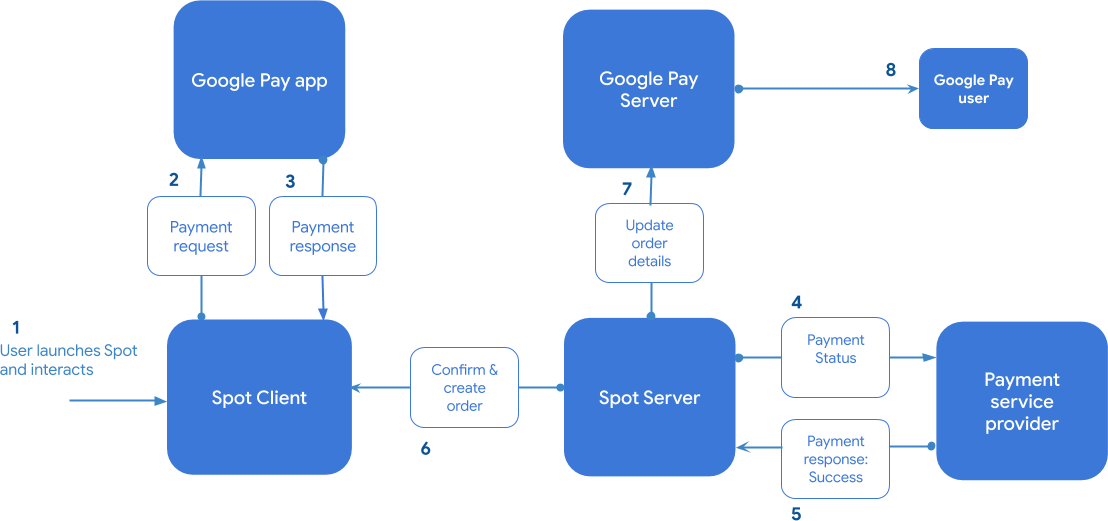
Google pay

clinet setup

Include the following script

<script async src="https://microapps.google.com/apis/v1alpha/microapps.js"></script>

Debugging in Chrome DevTools

Testing

  1. test account 在注册时 被提供
  2. 找到自己的spot

Debug Mode

  1. 可以切换 环境 生产/开发
  2. Debug a Spot on your phone using Chrome DevTools.

Web Simulator

在浏览器模拟 操作

https://microapps.google.com/simulator?appUrl=https://example.net/microapp.html

Spot URL

 deep link to the Spot with your spot id

https://microapps.google.com/your.microapp.id

Linking to specific paths

https://microapps.google.com/your.microapp.id?link=foo%2Fbar%3Fparam1%3Dabc%26param2%3Ddef
// 上面页面 会在app 跳转https://example.net/foo/bar?param1=abc&param2=def

Best Practices

  • All web pages of a Spot must be served through HTTPS only.
  •  use other domain must added to a list of allowed domains- contact your Google representative to do so.
  • No cookies
  • Use HTML5 Web Storage APIs to cache assets and store the state, and achieve fast, resumable experience when users return to the Spot.
  • Spots are hosted via an iframe within the Google Pay app, therefore you must include the following header when serving your web pages: “Content-Security-Policy: frame-ancestors https://microapps.google.com/“.
  • Refer to Performance Optimization for more recommendations on how to build a Spot with high performance.

性能优化

减少JavaScript大小

  • JavaScript的大小必须较小,以帮助用户在不良网络和/或受CPU限制的设备上访问您的Spot。
  • 仅从JS模块导入所需的功能,并从依赖项中消除无效代码。
  • 将您的JavaScript代码分成较小的块,并发送最少的代码以预先提供价值,同时按需加载其余代码。
  • 将性能预算设置为<200 KB的JS,以帮助提高性能,并在规划功能时坚持执行。

初始页面加载

  • 缩小页面大小。最小化要为初始页面加载的代码和资源的数量。
  • async在script标签上使用属性
  • 如果可能,请避免使用动态内容。使目标页面相对静态和可缓存。可缓存的着陆页将使后续应用加载速度更快。
  • 如果内容对于交互时间很重要,请尝试在服务器端呈现 时将其与初始页面加载一起使用,以避免额外的往返路程。但是,请注意,服务器端不应执行繁重的工作来处理动态内容,否则会减慢应用程序的加载速度。如果这是不可避免的,那么您可能需要重新考虑登录页面的UX设计。
  • 如果动态部分是可选的,则首先向用户显示静态部分(请参阅Service worker部分中的App Shell模型),然后使用客户端呈现 来加载动态内容。

页面过渡

  • 加载登录页面后,请使用客户端渲染 进行后续页面导航。这样可以提高效率并减少服务器端页面调用的数量。
  • 预加载/预取 资源以进行后续页面渲染。

Service workers

service worker has the potential to greatly improve initial page loading performance by caching the JS/CSS/static resources, which are necessary to render the page. In addition to the service worker, the app shell model allows some content to be displayed immediately while fetching the data asynchronously. The progressive change ensures a more native app-like experience even with flaky connections.

web PageSpeed 优化

google 建议 资源下载管理

webpagetest 网站优化

网站各种报告 google console

自动化测试 speed

如果您只是尝试使用PageSpeed Insights API,则不需要API密钥。如果您计划以自动化方式使用API​​并每秒进行多个查询,则需要一个API密钥。

https://developers.google.com/speed/docs/insights/v5/get-started

  1. 打开一个终端。
  2. 运行以下命令。如果您使用的是API密钥,则追加。 &key=yourAPIKey
  3. 响应是一个JSON对象
curl https://www.googleapis.com/pagespeedonline/v5/runPagespeed?url=https://developers.google.com

Cross-platform single sign-in Google 单点登陆

加载登陆按钮时, 会立即检查授权 情况, 如果成功 the Google servers return an access token and pass a new authorization result object to the callback. 如果该按钮无法进行即时模式授权,则用户必须单击登录按钮以触发访问流程

To enable cross-platform single sign-on:

  • The Android and web app must be registered in the same Google API Console project.
  • The requested scopes on each platform must match the scopes from other platforms.

关联 app 和 web site

https://developers.google.com/identity/smartlock-passwords/android/associate-apps-and-sites

OAuth 2

https://developers.google.com/identity/protocols/oauth2#libraries

  • 先请求google 接口 跳转到Google 认证框,会带上自己的redirect 链接
  • 在google 同意框 里 确认后, 会重定向 自己的页面 而且url 会带有 访问 token 的code
  • 在页面url里拿到code 再次请求 Google 接口 获取 token
{
  "access_token": "HbkBrQ5TAJFYUeLWsjhgWZ1Qt-ov9F0_B0S92aDhCMTQ", 
  "id_token": "eyJhbGciOiJSUzI1NiIsImtpZCI6IjZmY2Y0MTMyMjQ3NjUxNTZiNDg3NjhhNDJmYWMwNjQ5NmEzMGZmNWEiLCJ0eXAiOiJKV1QifQ.eyJpc3MiOiJodHRwczovL2FjY291bnRzLmdvb2dsZS5jb20iLCJhenAiOiI0MDc0MDg3MTgx", 
  "expires_in": 3599, 
  "token_type": "Bearer", 
  "scope": "https://www.googleapis.com/auth/userinfo.profile", 
  "refresh_token": "1//KCgYIARAAGAQSNwF-L9IEcbqfjUdRQuK1y01gl2m4"
}
  • 然后拿着access_token 去请求 Google 接口用户数据

https://developers.google.com/accounts/images/webflow.png

Using OAuth 2.0 for Web Server Applications

https://developers.google.com/identity/protocols/oauth2/web-server

Service accounts

Google API(例如Prediction API和Google Cloud Storage)可以代表您的应用程序运行,而无需访问用户信息。在这些情况下,您的应用程序需要向API证明自己的身份,但无需用户同意。同样,在企业方案中,您的应用程序可以请求委派对某些资源的访问

您从Google API控制台获得的服务帐户的凭据, include a generated email address that is unique, a client ID, and at least one public/private key pair. You use the client ID and one private key to create a signed JWT and construct an access-token request in the appropriate format.  然后,您的应用程序将令牌请求发送到Google OAuth 2.0授权服务器,该服务器会返回access token。该应用程序使用access token访问Google API。当令牌过期时,应用程序将重复该过程。

Using OAuth 2.0 for Server to Server Applications

https://developers.google.com/identity/protocols/oauth2/service-account

Google 登陆和注册

Integrating Google Sign-In into your web app

https://developers.google.com/identity/sign-in/web/people

Load the Google Platform Library

<script> src="https://apis.google.com/js/platform.js" async defer></script>

Specify your app’s client ID

<meta name="google-signin-client_id" content="YOUR_CLIENT_ID.apps.googleusercontent.com">

Add a Google Sign-In button

<div class="g-signin2" data-onsuccess="onSignIn"></div>

Get profile information

function onSignIn(googleUser) {  
var profile = googleUser.getBasicProfile();
console.log('ID: ' + profile.getId()); // Do not send to your backend! Use an ID token instead.  
console.log('Name: ' + profile.getName());  
console.log('Image URL: ' + profile.getImageUrl()); 
console.log('Email: ' + profile.getEmail()); // This is null if the 'email' scope is not present.
}

Sign out a user

<a href="#" onclick="signOut();">Sign out</a><script>  
function signOut() {    
  var auth2 = gapi.auth2.getAuthInstance();    
  auth2.signOut().then(function () {      
    console.log('User signed out.');    
  });  
}
</script>

Getting profile information

!! 请勿使用getId()返回的Google ID或用户的个人资料信息将当前登录的用户传达给您的后端服务器。而是发送ID令牌,可以在服务器上对其进行安全验证

// auth2 is initialized with gapi.auth2.init() and a user is signed in.

if (auth2.isSignedIn.get()) {
  var profile = auth2.currentUser.get().getBasicProfile();
  console.log('ID: ' + profile.getId());
  console.log('Full Name: ' + profile.getName());
  console.log('Given Name: ' + profile.getGivenName());
  console.log('Family Name: ' + profile.getFamilyName());
  console.log('Image URL: ' + profile.getImageUrl());
  console.log('Email: ' + profile.getEmail());
}

如果您只想登录用户,而无需获取用户ID以外的详细信息,则可以禁用检索基本配置文件信息,而仅请求配置文件范围

gapi.load('auth2', function() {
  auth2 = gapi.auth2.init({
    client_id: 'CLIENT_ID.apps.googleusercontent.com',
    fetch_basic_profile: false,
    scope: 'profile'
  });

  // Sign the user in, and then retrieve their ID.
  auth2.signIn().then(function() {
    console.log(auth2.currentUser.get().getId());
  });
});

Authenticate with a backend server 后端验证用户

如果应用或网站将Google登录用于与后端服务器通信,则可能需要识别服务器上当前登录的用户。To do so securely, after a user successfully signs in, send the user’s ID token to your server using HTTPS. 然后,在服务器上,验证ID令牌的完整性,并使用令牌中包含的用户信息建立会话或创建新帐户

Send the ID token to your server

//After a user successfully signs in, get the user's ID token:

function onSignIn(googleUser) {
  var id_token = googleUser.getAuthResponse().id_token;
  var xhr = new XMLHttpRequest();
  xhr.open('POST', 'https://yourbackend.example.com/tokensignin');
  xhr.setRequestHeader('Content-Type', 'application/x-www-form- 
  urlencoded');
  xhr.onload = function() {
    console.log('Signed in as: ' + xhr.responseText);
  };
  xhr.send('idtoken=' + id_token);
}

Verify the integrity of the ID token

Using a Google API Client Library

https://developers.google.com/identity/sign-in/web/backend-auth

Google One Tap 一键式注册 登陆

https://developers.google.com/identity/one-tap/web/guides/get-google-api-clientid

Get your Google API client ID // 获取api id

  1. Open the “Credentials” page of the Google APIs console
  2. 如果有 web client id 直接用, 没有就注册 click Create credentials > OAuth client ID to create one.

Configure your OAuth Consent Screen // 同意屏设置

同意屏窗口 告诉用户哪些data 会用到

  1. On the “OAuth consent screen” page, fill out the form and click the “Save” button. //填好保存
  2. Check “Verification Status”, if your application needs verification then click the “Submit For Verification” button to submit your application for verification // 然后验证

 If your app requests scopes categorized as sensitive or restricted, you will probably need to complete the verification process (see, however, the exceptions) // 如果app 获取敏感或者限制的数据 需要在验证时补写信息

https://support.google.com/cloud/answer/9110914

A few examples of sensitive scopes are some of the scopes used by the Calendar API, People API, and YouTube Data API, but there are others. Restricted scopes are fewer in number, currently including only scopes used by the Gmail API and Drive API.

验证提交时 要填写每一个Scopes justification 比如 My app will use https://www.googleapis.com/auth/calendar to show a user’s Google calendar data on the scheduling screen of my app, so that users can manage their schedules through my app and sync the changes with their Google calendar.

Load the One Tap client library

页面加载一键式陆库

需要登陆页面加载 <script src=”https://accounts.google.com/gsi/client”></script> //You can optimize your page’s loading speed by loading the script with the async and defer boolean attributes.

Display Google One Tap

将以下代码段放入要显示Google One Tap的任何页面中:

<div id="g_id_onload"
     data-client_id="YOUR_GOOGLE_CLIENT_ID"
     data-login_uri="https://your.domain/your_login_endpoint"
     data-your_own_param_1_to_login="any_value"
     data-your_own_param_2_to_login="any_value">
</div>

The data-login_uri attribute is the URI of the login endpoint of your own web app. You can add custom data attributes, which are sent to your login endpoint with the ID token retrieved from Google.

Automatic sign in and sign out

描述如何实现与用户使用“一键登录”登录或注销有关的功能

Sign in users automatically

<div id="g_id_onload"
     data-client_id="YOUR_GOOGLE_CLIENT_ID"
     data-auto_select="true"
     data-login_uri="https://your.domain/your_login_endpoint">
</div>

Sign up

用户退出您的网站时,可以将他们定向到自动显示“一键式”提示的页面。在这种情况下,必须禁止自动选择。 否则会死循环登陆

Verify the Google ID token on your server side (验证服务器端的Google ID令牌)

从Google返回ID令牌后,它会通过HTTP POST方法请求以参数名称凭据的形式提交给您的登录端点(后端)

1. 当您向登录端点提交凭据时,我们使用double-submit-cookie模式来防止CSRF攻击。Before each submission, we generate a token and then the token is put into both the cookie and the post body. See the following code example

csrf_token_cookie = self.request.cookies.get('g_csrf_token')
if not csrf_token_cookie:
    webapp2.abort(400, 'No CSRF token in Cookie.')
csrf_token_body = self.request.get('g_csrf_token')
if not csrf_token_body:
    webapp2.abort(400, 'No CSRF token in post body.')
if csrf_token_cookie != csrf_token_body:
    webapp2.abort(400, 'Failed to verify double submit cookie.')

2. Verify the ID token. Refer to Verify the integrity of the ID token for details.

通过HTTPS POST收到ID令牌后,必须验证令牌的完整性。要验证令牌是否有效,请确保满足以下条件:

  • 该ID令牌已由Google正确签名。使用Google的公共密钥(以JWK或PEM格式提供)来验证令牌的签名, 这些键会定期旋转。检查响应中的Cache-Control标头,以确定何时应再次检索它们。

强烈建议您使用适用于您平台的Google API客户端库或通用JWT库,而不是编写自己的代码来执行这些验证步骤

require_once 'vendor/autoload.php';

// Get $id_token via HTTPS POST.

$client = new Google_Client(['client_id' => $CLIENT_ID]);  // Specify the CLIENT_ID of the app that accesses the backend
$payload = $client->verifyIdToken($id_token);
if ($payload) {
  $userid = $payload['sub'];
  // If request specified a G Suite domain:
  //$domain = $payload['hd'];
} else {
  // Invalid ID token
}

GA GTM

1 链接跳转等待ga事件完成
@ datalayer 配置
[cc lang=”js”]
window.datalayer.push({
event: ‘orderGenerated’,
eventCallback: callback,
eventTimeout: 1000
})
[/cc]
@ gtm 点击触发条件设置
@ ga 代码里设置回调
[cc lang=”js”]ga(‘send’, ‘event’, {
eventCategory: ‘Outbound Link’,
eventAction: ‘click’,
eventLabel: event.target.href,
transport: ‘beacon’ //解决此问题的一种方式是将 transport 字段设置为 beacon
});[/cc]